About Me

My photo
Vancouver, British Columbia, Canada
I am a beekeeper in Vancouver, British Columbia. The bees forage all the way up Stoney Creek by Burnaby Mountain.I am committed to not exposing my bees to chemicals for pest control or a quick fix to their health. I am committed to keeping them without treatment and I am working very hard to make this a success. I prefer my bees to feel like their sister's in the wild and a little bit more comfortable with the care I provide. Enjoy the pictures and follow my beekeeping endeavours.

Sunday, January 23, 2011

Preparing the Hive for a Vancouver winter

After harvesting honey from the Matilda and Bombay, its time to give back to ensure they had enough storage to last through the winter that starts in Vancouver from November till end of February. Winter really starts for the bees when the last Sunflower and Aster flowers withers away. That is when there is nothing left to forage eventhough there may be nice sunny days that are ideal for the bees to fly out.

So to prepare for this I started to do price comparisons of Rogers 10kg sugar bags. The good thing about preparing the hive for winter is that there are no big holidays around the corner where everyone likes to bake for the family which is the best time for beekeepers to stock up on sugar. A 10kg bag of sugar during mid-August cost $8.88 - 9.99 at Superstore and when comes Thanksgiving or Christmas is near a bag will cost $$12.99-$13.99.


 I bought 8 bags of sugar. I've never bought so much sugar in my life before at a time. When I looked at the amount of sugar I bought, it felt I was running a bakery shop. Friends with cars are my best friends when I need to cart around heavy stuff. Ted was the driver of the day. Of course, Ted got a gorgeous jar of honey for helping.

I took a day off from work to mix the sugar into a 2:1 sugar syrup. Borrowed a propane burner and a witch concoction pot to deep fry turkey from a friend.


All the white pails behind the pot is to store the sugar syrup over the 10 weeks of feeding. My first winter with the bees, I used to make sugar syrup every week at home and pour them into one gallon containers. Then lug at least 2 one gallon container on the skytrain and then on a bus to get to the hive. It was too much of a hassle and that had to change. Making the sugar syrup at the gardens is the best method so far to save time and way more manageable. With the Witch Pot I could make 15 litres = 3.96 gallons at a time. That is about 10kg of sugar with 5 litres of water. But somehow I don't get why when I mix sugar with water in that proportion I don't quite get the 3.96 gallons I expect. I always get about 3.5 gallons or little less. The density of water must be quite expandable that it absorbs the sugar and does not add to the volume. If anyone has  got the science of this, I would like to try out your formula. Anyway, boiling 5 litres of water with the propane burner takes about 10mins or less which is really fast.


At the end of all the pouring, stirring and mixing of 80 kg of sugar with 40 litres of water, I yielded 30 gallons of 2:1 sugar syrup which was perfect for 3 hives to have 10 gallons (40kg) each to store for the winter. They stored perfectly well from September till it was all gone which was 1st week of November. I also added juice of 1 lime/lemon to 1 gallon of syrup every 2 weeks to boost Vitamin C intake.Hopefully, there will be some benefits to doing that.  Fumagilin was added as well for the 1st and 3rd week of feeding.  

After the 10 weeks of feeding 2:1 sugar syrup, Matilda and Bombay was back breaking heavy in the top brood chamber. The bottom brood chamber were mostly filled with pollen. I thought that was interesting, that the bees organized it in that way. Since I placed the frame feeder at the top chamber, it would be just easier and closer to just store the sugar syrup at the top and foragers can dump pollen at the bottom chamber to shorten the time to unload and do the next trip. The only problem was Camille was not taking in the syrup like the other 2 hive. In total it took just about 3 gallons. I cross my fingers that Camille will make it through the winter. 

Lastly for mite treatment, the hives were only sugar dusted. 2 cups of blended sugar per hive for 10 weeks. 1 cup per brood chamber. They were dusted on the same day each week for 10 weeks. I did not stay to count the mite fall after each dusting. Partly because I did not want to get disheartened by the number of mites I'll find. I did the sugar shake mite count every 3 weeks and my infestation rate is high! It was sitting at an average of 15-20%. The application was not consistent as well as sometimes I'll get 100 nurse bees and the week after I'll get 300 nurse bees as I was reading different articles that recommended differently. After doing some reading on this method, I'll only collect 1 cup of bees which is an approximate of 100 bees. I really like the sugar shake method as none of the bees in the test dies. They come out of the jar groggy but after 2 minutes, they are back in the hive. I also figured that if I am taking nurse bees who are mostly carriers of the mites, they are too important to lose. The caring for the thousands of larvae (big demanding job), feeding the queen, building comb and etc. Plus nurse bees have the highest levels of vitellogenin and it is vital to the health of entire colony. I am very conscious of the efficiency levels in the hive and I strive to not affect that efficiency by reducing the amount of bees I injure or kill in anything I do in the hive. 

Wednesday, October 13, 2010

Video Tour Around my Bee Yard

I just got a Kodak Video with digital camera 5 MP functions that can also immersed in water up to 3meters. So after some of you who had to tilt your head and putting up with mute video clips. This HD video tour around my yard would be a step up.


Leave a comment if you liked the video or let me know what else you would like to see in the hive.

Biggest day ever for beekeeping- My 1st Honey Harvest

On Aug 15th , I got my very 1st honey harvest. A honey harvest to me felt like passing my driver's licence test at the 1st attempt. I remembered all that nervousness taking that test, lips all getting dried, shaky hands, a bit wobbly on the feet, knowing that not many pass on their 1st try and when the tester says "You have passed!", all that cooped up feeling of joy just bursting out. When the honey started flowing from the extractor into the bucket for filtering, that was my "You have passed!" feeling. Hard to describe but I think this "You have passed!" feeling is quite close. Ok I gotta do the thank yous now. So I would like to thank the bees from Matilda and Bombay for providing 57lbs=25kg of honey. For the 1st year, this amount is excellent. Let me show you the pictures of the harvesting process.


There are 15 frames to harvest in the 2 supers. The stainless steel drum is a 2-frame extractor. So 2 frames get spinned at a time. The spinning was very time consuming. 

Here I am using an uncapping knife which is like a hot iron to melt the wax that the bees had made to seal the honey on the combs. Now for the build up of the "You've passed!" feeling.


Yes still empty. I am just about to turn on the tap. Hold on.....................


Let me show you a video, still pictures doesn't really cut it for the "You've passed!" feeling. .............


Sorry that you had to tilt your head 90degrees to the left to watch the video. I will improve my video taking next time. That golden flow is just gorgeous! Now this video below, I am pouring my 1st bottle of honey.


Then I start putting my orders together.


As a special touch and only for the 1st year, I placed a honey comb in each bottle. Each bottle of honey here is 1kg. The bottle weighs about 0.339kg so thats why the weighing machine shows 1.4kg.


This completes my 1st Honey Harvest. I am sold out of honey for the year. The white pail that was used to store the honey, is empty. Thanks to all who bought my honey. All that support you've shown allows me to carry on what I do best for the bees. On behalf of the bees, hope you enjoyed the honey if you were lucky enough to have got a bottle.

Thursday, August 19, 2010

Bees Drink Water

In Vancouver, we've had 3 weeks of hot weather, temperatures averaging above 28 degrees. All the grass turned brown and forest fires in the Interior of British Columbia are raging. Inside the hives, the temperature were definitely above the 30 degree range with the thousands of bees moving in/out of the hive to collect nectar. When I visited the hives a couple of times after sunset, the bees were bearding at the hive entrance. Bees beard at the hive entrance as it is too hot in the hive to rest. It is just like some of us who will sleep on the floor if our mattress is too hot or set up tent in the backyard where the temperature is cooler. When the ambient temperature in the hive cools, they will go back inside. Bees have a couple of ways to cool the hives down. They organize a few rows to fan the hot air out using their powerful wings. Another row of bees, on the other end of the hive entrance will be fanning air into the hive. Air circulation in the hive is now excellent with all these bees fanning. If you are lucky to be at the hive at this type of moments, place your hand slowly in front of the hive entrance and feel the power of the wind they create from those tiny bodies while at a stationary position. To top off the cooling strategy, foraging bees are sent out to collect water instead of the usual nectar. Below is a picture of the bees drinking water from a pail in the community garden. This pail is about 25 metres from the hive.


 As bees don't swim well or at all, they use their long tongue to reach into the water. When the water level, is beyond their tongue's reach, they may take the risk of swimming and that is when they will get into trouble. As a beekeeper, I should anticipate this. Know where their usual watering holes are and provide floats for them to land on, drink their fill and take off easily. Good floats can be sponge, ice cream sticks or clean wooden stakes. The water the bees source from is hard to control. However, if I can establish a watering hole near the hive, I'll provide water that I can drink as well. The water should be changed regularly and the container scrubbed off debris and algae.

Tuesday, August 3, 2010

Varroa Testing: Alcohol Wash vs Sugar Dusting method

It is the time of the year to determine varroa mite levels in the hive. I want to know the mite level to understand the severity of the infestation to determine the frequency of how often I should be treating the hive once I pull the supers out for harvesting.

In beekeeping literature, there are several methods to test for varroa mites and the method widely practiced in Vancouver is the alcohol wash. An alcohol wash requires you to capture 300bees about 1 cup into a bottle and pour anti-freeze wiper fluid (alcohol) to remove the varroa mites from the captured bees. The alcohol is poured out and the varroa mites flows out with it. You then count the varroa mites and multiply by 100 if you don't have brood or multiply by 600 if you have plenty of brood. The bees to be captured should be from the brood frames, so preferably nurse bees or drones.

I have been against this idea of alcohol wash and I was putting the idea of testing for varroa mites away all together. I thought why drown 300 precious nurse bees for this method. Nurse bees are the main food provider of the queen bee and growing larvae, as nurse bees vittelogen levels are the highest which is a component of the elixir we know as royal jelly. As some would know, the queen been is only fed with royal jelly. Nurse bees also support the growing larvae with worker jelly which are very demanding. At any one time in a healthy hive with a good laying queen, there are 8000+ larvae calling out for food.  So drowning 300 nurse bees will reduce the workforce for an essential task in the hive. It is also wasteful killing the bees like this and not part of my beekeeping philosophy. As all other mite testing methods known in the field does not yield accurate mite levels. Sugar dusting is the kindest method. So recently, I stumbled upon the apiculture section of the Ministry of Agriculture and Lands of British Columbia website about varroa testing and I found the method that fits my style of beekeeping. Click here on Varroa Detection Method to reach the site.

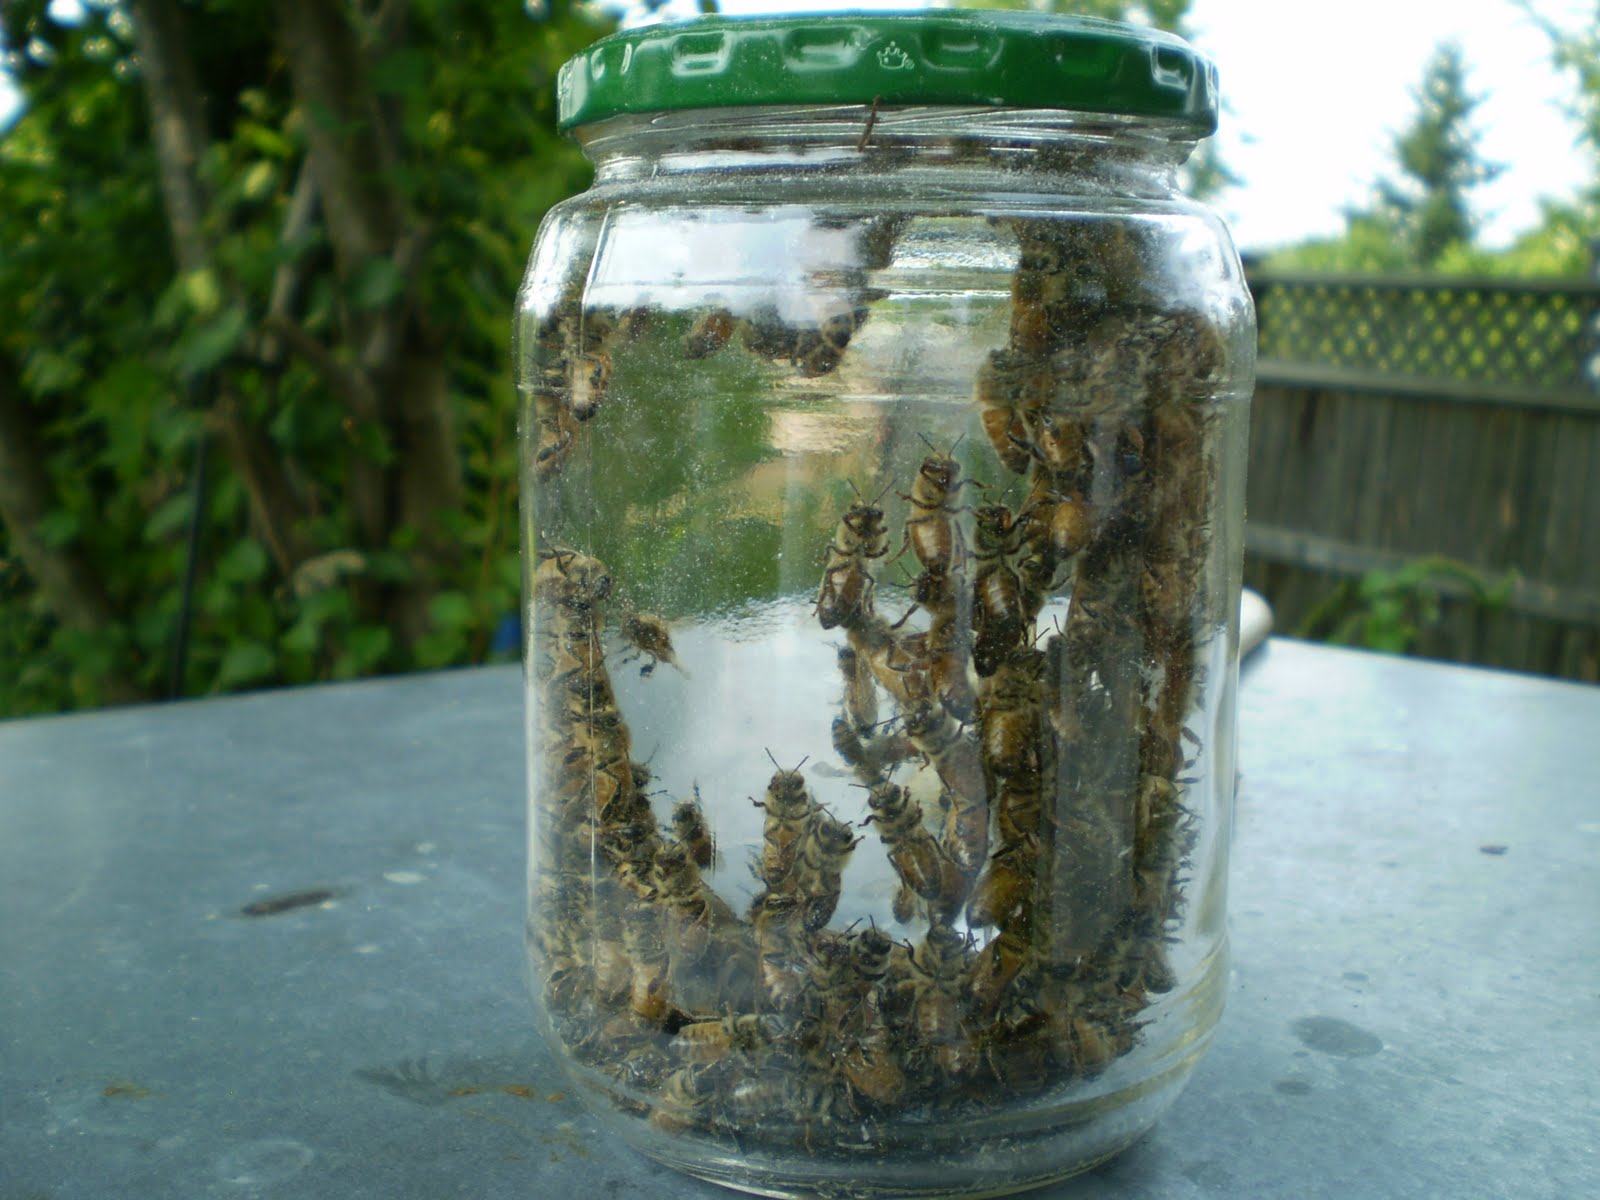
Icing sugar method about 100-200 bees in the jar

The Icing sugar method requires a wide mouthed jar with the cap cut and a 1/8th wire mesh fitted onto the cut cap. I used a pickle jar and used a can opener to cut a large hole on the cap. I also bought a wire mesh colander from Daiso for $2. I cut the wire mesh out of the colander and there was enough mesh to create another 3 more testing jars. I used super glue to stick the wire mesh on the cap. Wait for it to dry for 15 mins and I got my wide mouth jar ready for varroa testing.

Find a frame with open brood with lots of nurse bees and be very sure that the queen is not on the frame. I think bees found on open brood frame is better for this method than bees on capped brood frames because the varroa mites attached on those bees are waiting for the opportunity to enter the brood comb before it gets capped to lay their eggs onto the bee larvae. The newly hatched varroa mite will then feed on the larvae. Therefore the infestation levels should be highest on frames with open brood as it has the best conditions for the varroa mite to continue its life cycle. After capturing enough bees about 100-300 or 1 cup of bees, cap the jar and sprinkle 2 tablespoons of powdered sugar through the wire mesh. I think even flour can be used, though I have not tried it yet. I took a video to show how I executed the testing method. I was really rough with the bees in the jar. Don't mind me. I feel bad myself but it is only to shake out all the varroa mite for an accurate count and to give the unlucky bees in the jar with varroa mites relieve once the mites gets detached. None of the bees died in this method. Even if some got injured and eventually died, it would be less than 10 compared to a 100% kill if using the alcohol wash. After shaking the sugar out of the jar, release the bees at the front of the hive entrance. Remember that nurse bees have never flown out of the hive before and may not know how to fly back to the hive if they get disoriented. So always return the bees as close to the hive as possible. Enjoy the video. The bees in the video are from Matilda.


I tested Bombay first and then Matilda. The results of the testing are

Bombay : 1 mite/100bees = Low infestation level
Matilda : 8 mites/100bees = High infestation level

Click on the picture for an enlargement. After all that shaking. The red/black specks are varroa. A white paper backing makes it easier to spot the red Varroa mites.


Was wondering why Matilda had such constant high infestation levels since last year. Even before I had problems with the queen. I am still wondering why. It is still too early for Queen Matilda II to correct this. It is just barely a month ago she took over from the drone laying queen. The drone laying queen has probably created the perfect condition for varroa mites to reproduce. Varroa mites love to lay their eggs and grow up with drone bees because the drone combs are more roomy due to the larger size of the drone compared to the tight comb of the worker bee and the pupae stage of the drone is longer than the worker bee by a couple of days. The extra days allow the baby varroa to feed on the host longer. Matilda definitely needs to be treated the 1st once the supers are off on Aug 15th.

If you like this post. Leave a comment or click on some of the advertisements on the right. Thanks for reading this post. Hope this was helpful and a plus if it was an interesting read.

Read more on the Sugar Dusting Method: http://www.cals.ncsu.edu/entomology/apiculture/PDF%20files/2.03.pdf

Hive Inspection on 24th July

Did a normal hive inspection on 24th July before 2pm. Weather was sunny. I did not have much time so I laid out my task of the day so I won't forget what had to be done.

Task
Matilda

- Remove brick and move hive onto wooden pallets
-Move Queen excluder over 2nd empty super


Bombay
- Mark Queen
- Collect 100bees for varroa testing. 


Camile
- Normal Check

Inspection Notes:

Camile 
2 frames of honey/pollen
1 frame of capped brood
1/2 frame of eggs and brood in all stages
Pollen patty finished in 2 weeks. Installed patty on 10th July.
Queen spotted. Nucleus colony healthy. Spotted dozens of Varroa at bottom board.

Matilda
5 frames of honey
Queen Spotted and laying well

Bombay
No smoke used. Bees were still calm.
3 frames of comb honey and 4 frames of honey.
Marked queen. She seemed a little unconscious after being marked. I must have held her down a little too hard. Was really worried if she would do fine. After about 3 minutes, she got revived and ran around the frames. Ensured all legs were intact. Spotted lots of bees with Deformed wings.  Suspect varroa level high. Must do Varroa testing on next inspection. Brood comb that was freezed 3 weeks ago have all been removed.
Noticed 3 frames without foundation being contructed. Bees were holding on to each other like acrobats forming the semi-circle shape of the foundation they are creating.
Good pollen flow.

Sunday, July 18, 2010

Success in Requeening Matilda and Bombay

I have to thank James Macdonald the owner of Armstrong Apiaries for rescueing Matilda from being shut down and that allowed me to maintain my 2 hive operation. Actually, I have 3 hives now as the former queen of Bombay rules the newly set up nucleus colony, Camille. I called James on Saturday morning 4th July and left a voice message to order queens. He called me back within an hour or two and was very assuring that he would be able to solve my queen problems and he guarantees gentle quality queens. He sent out 2 queens by priority mail on Monday afternoon and they arrived on Tuesday morning July 6th in the package below.

The brown bag with holes is where the 2 queen cages were packed in. I picked up the package from the Post Office at 9am and brought them to work. After work, I installed one of the queens into Matilda who had the drone laying queen removed 2 days before.


My new queens travelled by Canada Post comfortably for 446km from Armstong to Coquitlam. They were in transit for less than 18hrs.

In the queen cage there were 4 attendant workers and the queen. They were moving in the cage in a circular manner all day long. Super active and very different from the queens from West Coast Bee Supplies. The pheromone from the new queen was strong, that she already had a bee from Matilda who could not wait to pay her allegiance to her future queen. This bee on the cage was so mesmerized feeding the new queen that she did not even care what was going on around her.


The bees of Matilda could not wait to free their new queen and was instantly busy eating the candy barrier. Do you notice the majority of the bees  in the photo facing the cage? They were clearly excited about their new queen.


3 days later, the new queen of Matilda has been released. This photo was taken yesterday. Notice the circle of attendants around her. She definitely commands alot of respect.  From reading the frames she started laying almost the moment she came out of the cage as the oldest larvae is already about 8 days old. Look at the size of her. She is HUGE! Her laying pattern is excellent. I saw 2 frames of freshly laid eggs. What a feeling of satisfaction that the new queen has convincingly taken over the rule of Matilda. All my worries since April have been set aside and I can sleep well at night knowing that Queen Matilda II is running her hive well =).  She moves around the frames in a steady and confident pace but when I attempted to pick her up to get marked, she can really sprint. I caught her anyway, firmly and carefully on her thorax.


She is now marked. She is in my queen marking cup waiting to dry the marker point on her back. The paint I use is a non-toxic ink. I marked her green which was 09' colors as I only have 2 hives and the color does not matter. If I had many more hives, I would follow the colors of the year. I mark my queens to ensure that if the hive created another queen to supercede her, I'll know that happened.

By the way, this is my 2nd hive inspection without gloves and have not got stung. My attitude towards them have changed. I am no more afraid or nervous around them, which I think they detected it before and was aggressive then. Now I am confident of my handling of the frames and  less bees get injured on each inspection. Maybe one or 2 still. It used to be more than 10 injured bees per inspection. To safer and happier beekeeping for them.